Sensors in IoT
Light Dependent Resistor
- 光敏电阻是一种电阻值随光照强度变化的传感器,key parameter为varying resistance
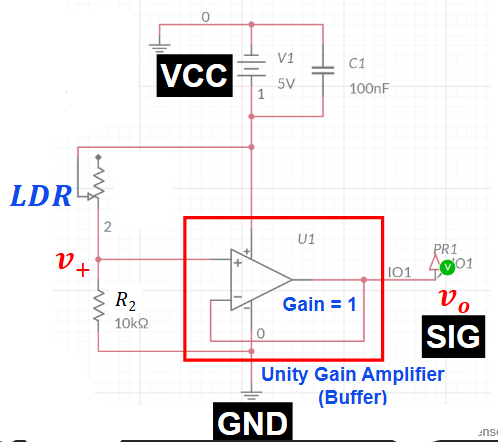
Light Sensor Based on LDR and Op-Amp
- 利用 LDR 将光照强度变化转换为电阻变化,再通过分压电路转换为电压变化:
- 光越强, 越小,因此输出电压越高。
- 使用 Gain = 1 的 Op-Amp Buffer 隔离 LDR 分压电路与 Arduino,避免后级负载影响测量电压(此处理想 Op-Amp可以维持原有电流不被分压)
- 最后由 Arduino 的 10-bit ADC 将模拟电压转换为 的数字值。
Photodiode
- 光电二极管也是光传感器,key parameter为varying current
- 原理是当具有足够能量的光子照射PN junction时会产生electron-hole pair从而光生电流,也就是说光越强光电流越大
Thermistor
- 热敏电阻的电阻会随温度变化
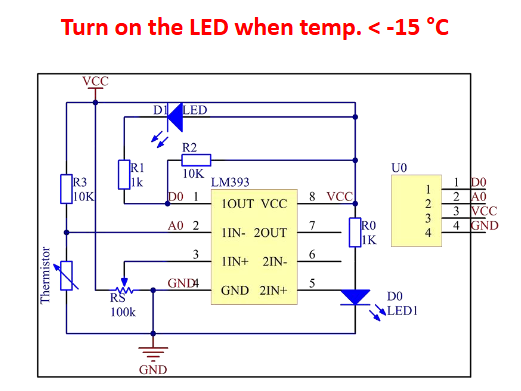
Temperature Sensor Circuit
- 此处Thermistor与其他电阻组成检测电路,再送入Comparator与参考电压进行比较
- 当温度达到设定条件时,比较器输出就会翻转,从而控制LED或是输出端
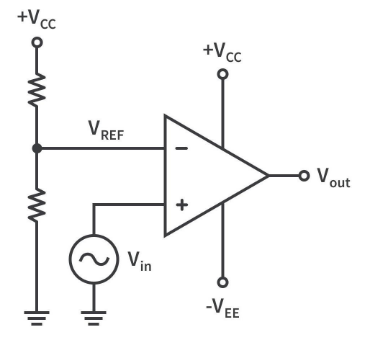
- Comparator简析:
- 直接比较电压,此处采用运放,当 时输出接近 ,当 时输出接近
Soil Humidity Sensor
- Key Parameter:Varying Resistance
- 土壤含水量改变 → 探针间导电能力/等效电阻改变 → 输出电压改变。
- 一般土壤越湿,导电能力越强;课件实验中 Soil Moisture ↑ → Sensor Voltage ↓。
- 可通过实验曲线进行 calibration,将传感器电压换算为 Soil Moisture。 Lecture#4
DHT11: Temperature and Humidity Sensor
- 同时检测 Temperature + Humidity。
- 内部包含:
- NTC Thermistor:温度 → Resistance 变化。
- Humidity Sensing Component:湿度 → Capacitance 变化。
- 相对湿度:
- 电容式湿度检测基本关系:
湿度变化会改变介质性质,从而改变 。
- 传感器出厂时的 Calibration Coefficients 储存在 OTP Memory,由内部检测程序自动进行校准。 Lecture#4
DHT11 Data Transmission
DHT11 使用数字信号向 MCU 发送 40 bits:
依次为:
- Humidity Integral Part
- Humidity Decimal Part
- Temperature Integral Part
- Temperature Decimal Part
- Checksum
- Bit
0/1通过 HIGH 电平持续时间不同来区分。 - 课件示例:
- Humidity:
0011 0101→ 35% - Temperature:
0001 1000→ 24°C
- Humidity:
- Data pin 通常配合上拉电阻连接 MCU。 Lecture#4
- Bit
DHT11 vs DHT22
| DHT11 | DHT22 | |
|---|---|---|
| Voltage | 3–5 V | 3–5 V |
| Max Current | 2.5 mA | 2.5 mA |
| Temperature | 0–50°C / ±2°C | -40–80°C / ±0.5°C |
| Humidity | 20–80% / ±5% | 0–100% / ±2–5% |
| Sampling Rate | 1 Hz | 0.5 Hz |
| Advantage | Low Cost | More Accurate |
简单理解:DHT11 便宜且快一点;DHT22 范围更大、精度更高。 Lecture#4
Touch Sensor
- Key Parameter:Varying Capacitance
- 基本电容:
- 未触摸时主要存在 Sensor Capacitance 。
- 手指靠近/触摸后引入 Finger Capacitance → 总电容增加。
- 控制 IC 检测电容变化并输出 Touch / No Touch 状态。
- 课件模块使用 TTP223 Touch Sensor IC。 Lecture#4
Sound Sensor
- Key Parameter:Varying Output Voltage
- 使用 Dynamic Microphone:
- Sound → diaphragm 振动
- 带动 coil 在 magnetic field 中运动
- 电磁感应产生变化的输出电压
- 即:
模块包含:
- Microphone
- LM393 Comparator
- Sensitivity Adjust
A0:Analog OutputD0:Digital Output- Power LED / Sound Detect LED
- VCC / GND
A0 可观察声音强弱对应的模拟电压;D0 通过 Comparator 判断声音是否超过设定阈值。 Lecture#4
Electromagnetic Induction Review
电流会产生磁场——Ampere’s Law:
变化的磁通会产生 EMF——Faraday’s Law:
其中:
- :Magnetic Field
- :Electric Current
- :Permeability
- :Magnetic Flux
- :Electromotive Force (EMF)
也是 Near-Field Inductive WPT 等系统的基础。 Lecture#4
Vibrate Sensor
- 课件使用 SW-18015P Vibration Shaking Switch。
- 振动 → 内部机械触点状态变化 → 电路产生电压变化。
- 模块通过 LM393 Comparator 将其转换为稳定的 Digital Output。
- 可用于检测震动、敲击、移动等事件。 Lecture#4
Ultrasound Sensor
课件使用 HC-SR04,通过测量超声波的 Time of Flight 判断距离。
工作流程:
声速:
因为声波经历“去 + 回”:
因此:
其中 为 Echo HIGH 持续时间。 Lecture#4
HC-SR04 时序:
- MCU 向 Trigger 输入约
10 μs HIGH。 - Sensor 发出一组约 40 kHz ultrasound pulses。
- 超声波遇到物体后反射。
- RX 接收到反射波。
- Echo HIGH duration = propagation delay。
- MCU 根据 Echo 时间计算距离。 Lecture#4
Arduino 程序核心:
digitalWrite(triggerPin, HIGH);
delayMicroseconds(10);
digitalWrite(triggerPin, LOW);

time = pulseIn(echoPin, HIGH);
cm = 0.017 * time;
英寸转换:
Lecture#4
Commonly Used Actuators in IoT
Relay
Relay = 用低功率控制信号控制高功率电路的电磁开关。
- Coil 通电 → 产生磁场 → 改变机械开关位置。
- 三个主要接点:
- COM:Common
- NC:Normally Closed
- NO:Normally Open
- Coil 未通电:COM ↔ NC。
- Coil 通电:COM ↔ NO。
- 用途:Arduino 等低压控制器控制 AC 220 V 等高功率负载。 Lecture#4
课件示例:
- BC547 transistor:放大 Arduino 控制电流、驱动 relay coil。
- 1N4007 diode:用于处理 relay coil 断电时产生的反向感应电压。
- 控制电路和高压负载由 Relay 隔离。 Lecture#4
Buzzer
利用 **Piezoelectric Disc(压电片)**振动产生声音。
Passive Buzzer
- 本身没有 oscillator。
- 需要外部 AC / PWM waveform 驱动。
- 改变 frequency → 改变音调,可播放旋律。
Active Buzzer
- 内部自带 oscillator。
- 输入 DC Voltage 即可自动产生 AC 驱动压电片。
- 控制简单,但音调控制能力较弱。 Lecture#4
Buzzer Experiment:Arduino 按照不同 frequency 和 duration 输出信号给 Passive Buzzer,从而产生 melody。 Lecture#4
DC Motor
基本原理:载流导体处于磁场中会受到 Lorentz Force。
通过 Right Hand Rule 判断:
- Current
- Magnetic Field
- Force
之间的方向关系。
Motor 内主要包括:
- Stator
- Rotor / Armature
- Coil
- Brush
- Commutator
Rotor coil 受到力矩开始旋转;Commutator 会周期性切换电流方向,使转矩始终推动 rotor 向同一方向连续旋转。 Lecture#4
Vector Calculus Review
Unit Vector:
Dot Product
- 衡量两个 vector 在相同方向上的程度。
- 结果为 Scalar。
Cross Product
- 衡量两个 vector 的方向差异。
- 结果为 Vector。
Cross Product 的方向由 Right Hand Rule 判断。 Lecture#4
Ampere’s Law
电流周围会产生环形 Magnetic Field:
- 电流越大 → 磁场越强。
- 磁场方向由 Right Hand Rule 判断。
- Solenoid 将多匝线圈产生的磁场叠加,使内部形成较强磁场。 Lecture#4
Control DC Motor
Arduino 通常使用 PWM (Pulse Width Modulation) 控制 DC Motor。
PWM:
- Frequency / Period 保持固定。
- 改变 Duty Cycle → 改变平均输出功率 → 改变 motor speed。
因此:
实际 Motor 需要较大电流,因此课件电路使用外部电源和驱动元件,而不是直接由 Arduino I/O 驱动。 Lecture#4
Servo Motor
Servo Motor 是带有 Position Feedback 的电机系统,内部包含:
- DC Motor:产生旋转。
- Gear Train:减速并增加 torque。
- Potentiometer:检测当前角度。
- Control Unit:比较目标角度与实际角度并自动调整。
- 属于 Closed-Loop Control。 Lecture#4
Servo 通过 pulse width 控制位置:
- Frequency ≈ 50 Hz
- Period ≈ 20 ms
- 约
1 ms→ 0° 1.5 ms→ 90°- 约
2 ms→ 180° - 不同 Servo 可扩展到约
0.5–2.5 ms。 Lecture#4
课件程序使用:
pulsewidth = (angle * 11) + 500;
即大约:
每个控制周期:
HIGH → pulsewidth
LOW  → 20000 - pulsewidth
程序让 Servo:
循环摆动。 Lecture#4
Step Motor
Stepper Motor 通过依次给不同 coil 通电改变 stator magnetic field,使 rotor 每次旋转一个固定角度:
特点:
- 一次移动一个固定 Step。
- 可以精确控制 angle / position。
- 改变线圈通电顺序 → 改变旋转方向。
- 连续快速切换 → 连续旋转。 Lecture#4
Motor Comparison
| Motor | 主要特点 | 课件应用 |
|---|---|---|
| DC Motor | 连续高速旋转、主要控制 Speed | Washing Machines、Air Conditioners、Computer Fans |
| Stepper Motor | 固定 Step、精确 Position Control | Car Side Mirror Tilts、Security Cameras、3D Printers |
| Servo Motor | Feedback + 精确 Angle Control | Cameras、Solar Array / Antenna Positioning、Automatic Doors |
Lecture#4
Tutorials and Circuit Simulation
Power Switch Circuit
目的:用低功率控制信号控制外部 Power Supply。
课件 Arduino 电路使用 PMOS;Multisim 中只有 2N7000G NMOS,因此模拟时需要调整电路。 Lecture#4
整体关系:
Simulation 分成两个 Block:
-
**Block 1
- 建立 circuit schematic。
- 输入 和 。
- 同时观察 、 waveform。
- Voltage range:-15 V ~ +15 V。
- Time:0 ~ 1 s。
-
**Block 2
- 使用 MOSFET power switch。
- 根据 Block #1 的 控制 MOSFET。
- 同时观察 、 waveform。
- 课件答案展示 两种状态对应的切换结果。 Lecture#4
Magnetic Field from Solenoid
多匝 coil 中的电流产生的 magnetic fields 相互叠加,形成类似条形磁铁的磁场:
- Solenoid 内部:磁场较强、方向较一致。
- 外部:磁力线由一端返回另一端。
- 相关量:
- :单位长度内穿过 enclosed surface 的 current turns
- :积分路径长度
- :Electric Current
- :Permeability
其基础仍是 Ampere’s Law:
Lecture#4
第 47、61 页为章节目录页;第 67 页为课程安排,第 68 页为结束页,没有新增 Sensors / Actuators 知识点。